Building the London Startup Directory website using Clojure, Noir and MongoDB on Heroku - Part Two
Introduction
This is the second installment of my foray into website development using Clojure, Noir and MongoDB. Please see the read Part One if you missed it.
In this post, I will focus on MongoDB integration.
The code is a work in progress available on github
Local Install
First, we need to be able to develop and test our application locally.
brew install mongodb
mongod
This installs and runs MongoDB using the default port and storing data under /usr/local/var/mongodb.
The following commands will test that your database is behaving as expected.
mongo
> db.test.save( { a: 1 } )
> db.test.find()
Monger
I use Monger which requires the following dependency in your project.clj:
[com.novemberain/monger "1.5.0"]
Connection to the database is configured in the src/londonstartup/models.clj file like this:
(ns londonstartup.models
  (:require [monger.core :as mg]))


(defn initialize []
  (let [uri (get (System/getenv) "MONGOLAB_URI" "mongodb://127.0.0.1/londonstartup")]
    (monger.core/connect-via-uri! uri)))
We use the MONGOLAB_URI environment variable. This is the key to connect to a different database in each environment if you are using Mongolab services on Heroku. You will need to adapt this if you are using MongoHQ for example. By default, we connect to a local MongoDB instance. The database name is set to be “londonstartup”.
The initialisation is called in the modified src/londonstartup/server.clj file
(ns londonstartup.server
  (:require [noir.server :as server]
            [londonstartup.models :as models]))

(server/load-views-ns 'londonstartup.views)

(defn -main [& m]
  (let [mode (keyword (or (first m) :dev))
        port (Integer. (get (System/getenv) "PORT" "8080"))]
    (models/initialize)
    (server/start port {:mode mode
                        :ns 'londonstartup})))
Model
Our application is the London Startup Directory which simply lists London startups, as you have certainly figured out. The main object is a startup, which looks like this in JSON:
{ "_id" : ObjectId("51adbfdcb0c606762558d6c0"),
  "website" : "www.example.com",
  "name" : "Example" }
Website and name must be unique.
We need the standard CRUD functions plus the ability to list all startups. There is also some validation code to ensure that each startup object is well formed. Here is the code:
(ns londonstartup.models.startup
  (:require [monger.core :as mg]
            [monger.collection :as mc]
            [noir.validation :as validate]
            [londonstartup.models :as models])
  (import org.bson.types.ObjectId))


(def ^:dynamic collection "startups")

;; Result
(defn add-error [result key msg]
  (let [errors (get-in result [:errors key] [])]
    (assoc-in result [:errors key] (conj errors msg))))

(defn result [value]
  {:value value})

(defn error [key msg]
  {:errors {key [msg]}})

(defn has-error? [result]
  (contains? result :errors ))

(defn errors [result]
  (:errors result))

(defn value [result]
  (:value result))

;; Validation
(defn has-id [startup]
  (let [id (:_id startup)]
    (and id (not-empty (str id)))))

(def validation-rules
  [[:website validate/has-value? "A startup must have a website"],
   [:name validate/has-value? "A startup must have a name"]])

(defn valid?
  ([startup]
    (reduce #(valid? startup %1 %2) (result startup) validation-rules))
  ([startup result [field test msg]]
    (if (test (field startup))
      result
      (add-error result field msg)
      )))

;; CRUD

(defn total []
  (result (mc/count collection)))

(defn id->startup [id]
  (result (mc/find-one-as-map collection {:_id id})))

(defn website->startup [website]
  (result (mc/find-one-as-map collection {:website website})))

(defn website-free? [website]
  (result (= 0 (mc/count collection {:website website}))))

(defn startups []
  (result (mc/find-maps collection)))

(defn add! [startup]
  (let [validation-result (valid? startup)]
    (if (not (has-error? validation-result))
      (let [oid (if (has-id startup) (:_id startup) (ObjectId.))]
        (if (nil? (value (id->startup oid)))
          (if (value (website-free? (:website startup)))
            (result (get (mc/insert-and-return collection (merge startup {:_id oid})) :_id ))
            (error :website "Website already in use."))
          (error :startup "Startup already exists")))
      validation-result)))

(defn update! [startup]
  (let [validation-result (valid? startup)]
    (if (not (has-error? validation-result))
      (when-let [id (:_id startup)]
        (when-let [old-startup (value (id->startup id))]
          (if (or (= (:website startup) (:website old-startup)) (value (website-free? (:website startup))))
            (do
              (mc/update-by-id collection id startup)
              (result id))
            (error :website "Website already in use."))))
      validation-result)))


(defn remove! [id]
  (result (mc/remove-by-id collection id)))

(defn remove-website! [website]
  (result (mc/remove collection {:website website})))
Let’s go through it.
Result
I do not want to use the
noir.validation/rule here as it would mean that view code is bleeding in my model layer.
Therefore, the functions return result maps instead of directly returning
result values.
The result holds the value and optional error messages and a number of helpers allow you to manipulate it:
(result "a result")
;;{:value "a result"}

(value (result "a result"))
;;"a result"

(has-error? (result "a result"))
;;false

(error :key "Error Msg")
;;{:error {:key ["Error Msg"]}

(has-error? (error :key "Error Msg"))
;;true

(add-error (result "a result") :key "Error Msg")
;;{:value "a result" :error {:key ["Error Msg"]}
There is certainly a better way to return errors, maybe with a state monad. I am reluctant to use clojure bindings as it is not functional enough for my taste.
Validation
The validation code has been factored between the list of rules
(def validation-rules
  [[:website validate/has-value? "A startup must have a website"],
   [:name validate/has-value? "A startup must have a name"]])
and the validation code
(defn valid?
  ([startup]
    (reduce #(valid? startup %1 %2) (result startup) validation-rules))
  ([startup result [field test msg]]
    (if (test (field startup))
      result
      (add-error result field msg)
      )))
The validation code returns a result with the startup as value and the errors if any.
We can use the noir.validation/has-value? here because they are just predicate without side effect.
CRUD
Finally the CRUD code interacts with the database. All functions are simple beside the add! and
update! which test for duplicate object and website names (Using a naive check, I admit).
The validation code in these two functions will be migrated to the validation rules in the future.
I have also defined the corresponding MongoDB collection in a dynamic var:
(def ^:dynamic collection "startups")
This allow us to change the collection name during integration test.
Object ID
Every MongoDB document (our unit of storage) requires an _id. MongoDB will create a new document without
it but it means that our startup object is mutated. The Monger website recommends to create the object id ourselves,
hence the following code in add!
let [oid (if (has-id startup) (:_id startup) (ObjectId.))]
Test
You can find tests here. It is currently a mix of unit and integration tests and you will need a running local database to execute them.
(ns londonstartup.models.startup-test
  (:require [londonstartup.models.startup :as startup]
            [londonstartup.models :as models]
            [monger.core :as mg]
            [monger.collection :as mc])
  (:use clojure.test)
  (:use noir.util.test)
  (import org.bson.types.ObjectId))


;; Result test
(deftest add-error
  (let [init-result (startup/result nil)
        result1 (startup/add-error init-result :website "Error1")
        result2 (startup/add-error result1 :website "Error2")
        result3 (startup/add-error result2 :name "Name Error")]
    (is (= {:value nil :errors {:website ["Error1"]}} result1))
    (is (= {:value nil :errors {:website ["Error1" "Error2"]}} result2))
    (is (= {:value nil :errors {:website ["Error1" "Error2"] :name ["Name Error"]}} result3))))

(deftest result
  (is (= {:value nil} (startup/result nil)))
  (is (= {:value 3} (startup/result 3))))

(deftest error
  (is (= {:errors {:website ["Error"]}} (startup/error :website "Error"))))

(deftest has-error?
  (is (not (startup/has-error? (startup/result nil))))
  (is (startup/has-error? (startup/add-error (startup/result nil) :website "Error"))))

(deftest errors
  (is (nil? (startup/errors (startup/result nil))))
  (is (= {:website ["Error"]} (startup/errors (startup/add-error (startup/result nil) :website "Error")))))

(deftest value
  (is (nil? (startup/value (startup/result nil))))
  (is (= 3 (startup/value (startup/result 3)))))


;; CRUD test
(let [google-id (ObjectId.)
      yahoo-id (ObjectId.)
      github-id (ObjectId.)
      google {:_id google-id :website "www.google.com" :name "Google Inc."}
      yahoo {:_id yahoo-id :website "www.yahoo.com" :name "Yahoo! Inc."}
      github {:_id github-id :website "www.github.com" :name "Github"}]

  ;; Fixtures
  (defn init-db [f]
    (models/initialize)
    (binding [startup/collection "startupsTEST"]
    (f)))

  (defn clean-db [f]
    (mc/remove startup/collection)
    (startup/add! google)
    (startup/add! yahoo)
    (f))

  (use-fixtures :once init-db)
  (use-fixtures :each clean-db)

  ;;Tests
  (deftest valid?
    (is (not (startup/has-error? (startup/valid? google))))
    (is (startup/has-error? (startup/valid? {}))))

  (deftest total
    (is (= 2 (startup/value (startup/total)))))

  (deftest id->startup
    (is (= google (startup/value (startup/id->startup google-id)))))

  (deftest website->startup
    (is (= google (startup/value (startup/website->startup "www.google.com")))))

  (deftest website-free?
    (is (startup/value (startup/website-free? "www.doesnotexist.com")))
    (is (not (startup/value (startup/website-free? "www.google.com")))))

  (deftest startups
    (is (= (list google yahoo) (startup/value (startup/startups)))))

  (deftest add!
    (startup/add! github)
    (is (= 3 (startup/value (startup/total)))))

  (deftest update!
    (is (= google-id (startup/value (startup/update! (merge google {:website "www.new.com"})))))
    ;(is (= "www.new.com" (:website (startup/value (startup/id->startup google-id))))))
    )

  (deftest remove!
    (startup/remove! google-id)
    (is (= 1 (startup/value (startup/total))))
    (is (= nil (startup/value (startup/id->startup google-id)))))

  (deftest remove-website!
    (startup/remove-website! "www.google.com")
    (is (= 1 (startup/value (startup/total))))
    (is (= nil (startup/value (startup/id->startup google-id))))))
The interesting part is the use of Clojure binding to change the database collection during test:
  ;; Fixtures
  (defn init-db [f]
    (models/initialize)
    (binding [startup/collection "startupsTEST"]
    (f)))
We can now safely run the test on the same database as the application knowing that we only touch test collections.
Running the test ensures that our code integrated correction with the database.
lein test

lein test londonstartup.models.startup-test

Ran 16 tests containing 26 assertions.
0 failures, 0 errors.
Heroku
After having tested that our model layer with a local database, it is time to configure our staging and production environments.
Let’s start by adding a MongoDB database. I am using the MongoLab add-on but I could have used the MongoHQ.
heroku addons:add mongolab:sandbox --remote staging
heroku addons:add mongolab:sandbox --remote production
Even if the sandbox database (512MB) is free, you will need to have added you credit card information in your Heroku account.
In your apps dashboard, you will find the MongoLab Sandbox add-on which will redirect you to the MongoLab website where you will find the connection URL, username and password. For example, the staging URL has the following shape:
mongodb://<dbuser>:<dbpassword>@ds12345.mongolab.com:35147/heroku_app987654321
This is the URL that you will use in your application.
Heroku will create a MONGOLAB_URI environment variable for you in each environment and you can verify it value using the heroku command like this:
heroku config
=== londonstartup-staging Config Vars
JVM_OPTS:     -Xmx400m
LEIN_NO_DEV:  true
MONGOLAB_URI: mongodb://<dbuser>:<dbpassword>@ds12345.mongolab.com:35147/heroku_app987654321
PATH:         .lein/bin:/usr/local/bin:/usr/bin:/bin
Since we use the MONGOLAB_URI environment variable in our code, we will automatically switch database for each environment.
Now you can run same integration test remotely:
heroku run lein test

Running `lein test` attached to terminal... up, run.8765
Picked up JAVA_TOOL_OPTIONS:  -Djava.rmi.server.useCodebaseOnly=true
Retrieving org/clojure/tools.nrepl/0.2.3/tools.nrepl-0.2.3.pom from
Retrieving org/clojure/pom.contrib/0.1.2/pom.contrib-0.1.2.pom from
Retrieving clojure-complete/clojure-complete/0.2.3/clojure-complete-0.2.3.pom from clojars
Retrieving org/clojure/tools.nrepl/0.2.3/tools.nrepl-0.2.3.jar from
Retrieving clojure-complete/clojure-complete/0.2.3/clojure-complete-0.2.3.jar from clojars
Picked up JAVA_TOOL_OPTIONS:  -Djava.rmi.server.useCodebaseOnly=true

lein test londonstartup.models.startup-test

Ran 16 tests containing 26 assertions.
0 failures, 0 errors.
That’s it!
Conclusion
This post described my first steps using MongoDB with Clojure. We have seen how to configure a local database and write a model layer for a very simple application and test it. Finally, we have configured a MongoDB instance in our Heroku environment and successfully run the same tests remotely.
In the next part, we will develop our application controller and views.
Building the London Startup Directory website using Clojure, Noir and MongoDB on Heroku - Part One
Introduction
When I was looking for new opportunities in London, I found it difficult to get a list of the startups in the area. There are many incomplete sources but no central up-to-date directory.
To experiment with Clojure, Noir, MongoDB and Heroku, I decided to quickly throw and new website doing just that: A curated London Startup Directory.
Getting the list of startup in London or in any location is a moving target. By definition, startups appear and disappear all the time. The service must be able to dynamically keep itself up to date either by regularly asking registrar to confirm their data or by listening the interworld to check if the startup is still alive.
In part one, I will focus on creating a staging and production environment on Heroku to run a skeleton of the new website. Part two will concentrate on the MongoDB connection.
The code is a work in progress available on github
Noir Toolset
Install Leiningen:
brew install leiningen
I had to manually add the Noir template in my ~/.lein/profile.clj:
{:user {:plugins [[noir/lein-template "1.3.0"]]}}
This allowed me to create my Noir project scaffold:
lein noir new londonstartup
cd londonstartup
You can now start the server in the REPL
lein repl

(server/start 8080)
The server/start command will start the server on port 8080 of your local machine:
Starting server...
2013-05-29 15:03:29.808:INFO::Logging to STDERR via org.mortbay.log.StdErrLog
2013-05-29 15:03:29.809:INFO::jetty-6.1.25
2013-05-29 15:03:29.821:INFO::Started SocketConnector@0.0.0.0:8080
Server started on port [8080].
You can view the site at http://localhost:8080
Opening localhost:8080/welcome with return a simple default page. Editing a file in your project is automatically picked up. The development loop is short.
Github
Let’s create a new local git repository
git init
git add .
git commit -m "Initial Commit."
Create a new remote github.com/emeka/londonstartup repository on Github and push:
git remote add origin git@github.com:emeka/londonstartup.git
git push -u origin master
Heroku
Install Heroku Toolbelt (I prefer to use homebrew):
brew install heroku-toolbelt
This should give you the heroku command. If you read the Getting Started with Clojure on Heroku document, you will see that Heroku has its own Leiningen template which add some extra convenience features useful for Heroku development.
Since we already have created our project, we will add these features manually.
The modified project.clj looks as following:
(defproject londonstartup "0.1.0-SNAPSHOT"
            :description "London Startup Directory"
            :dependencies [[org.clojure/clojure "1.4.0"]
                           [noir "1.3.0-beta3"]]
            :license {:name "Simplified BSD License"
                      :url "http://en.wikipedia.org/wiki/BSD_licenses"}
            :main londonstartup.server
            :min-lein-version "2.0.0"
            :plugins [[environ/environ.lein "0.2.1"]]
            :hooks [environ.leiningen.hooks]
            :profiles {:production {:env {:production true}}})
In addition, the Heroku template adds a Procfile in the root directory of our project:
echo "web: lein with-profile production trampoline run -m londonstartup.server" > Procfile
This file is used by foreman to start a local server:
PORT=8888 foreman start
should now start a server accessible at http://localhost:8888. I needed to specify the port because the default one conflicts with launchd.
We will do the right thing from the start and create a staging environment where the application is validated before going to production. The document Managing Multiple Environments for an App explains how to configure several environments.
heroku create londonstartup-staging --remote staging
creates a new Heroku app on the remote branch call staging.
git add .
git commit -m "..."
git push staging master
After some seconds, my new Heroku application was available on londonstartup-staging.herokuapp.com.
git config heroku.remote staging
will make the staging remote Heroku’s default and will prevent us to touch production by mistake.
Let’s directly create the production environment:
heroku create londonstartup-production --remote production
git push production master
We now have a production environment at londonstartup-production.herokuapp.com
I like to have a staging and production branches that will track staging/master and production/master:
git config push.default tracking
git checkout -b staging --track staging/master
git checkout -b production --track production/master
Now, any push from staging or production will update my staging or production environment respectively. I still have to setup a proper tagging convention to only push well tagged commit to staging and production.
Conclusion
Et voilà, we have two environments deployed plus our github repository ready for development. Part two will focus on MongoDB configuration and a minimal functionality. We will later add an automatic CI.
Database for the Federated Cloud (Part One)
Introduction
This article describes how federated database will be key to the federated cloud.
In part one, we will describe how entreprise architecture has changed with the arrival of the cloud and how we think it will evolve in the future. In part two, we will give a list of database technologies that will support a federated cloud model.
Federated Cloud
A cloud infrastructure is federated when it combines the resources of different cloud providers. Federating your cloud solution has the following benefits:
- no vendor locking,
- higher availability if your application is designed properly.
The related costs are:
- higher complexity due to different infrastructure capabilities and API,
- multiple provider relationships and billing,
- higher networking cost.
While using a federated cloud, we still want centralized
- management interface,
- monitoring,
- billing
In addition, we still need to share our data between different instances.
Architecture
Before the Cloud
Before the cloud and still for the majority of companies, IT infrastructure is characterised by some computation, network and storage resources manually provisioned in one or more dedicated datacentres after a lengthy procurement process.
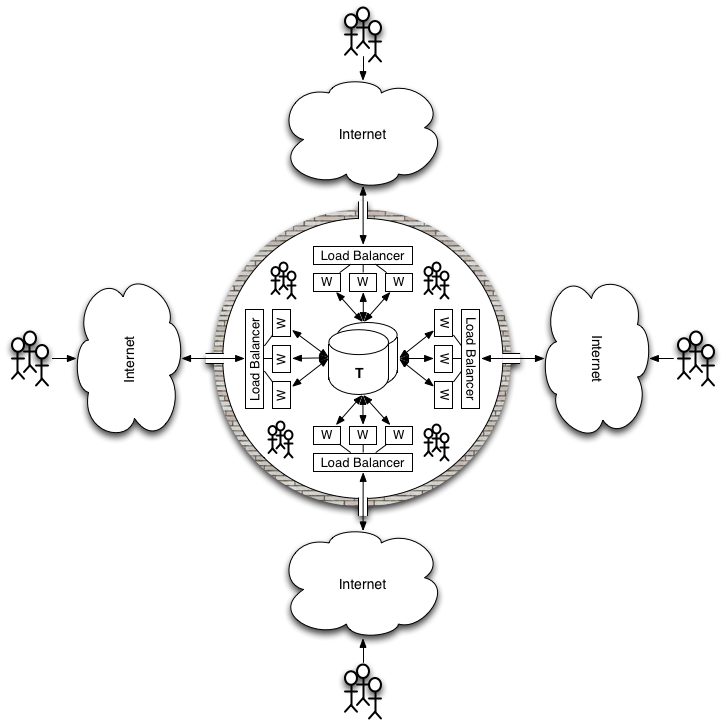
With the help of some naming services (DNS) and maybe some content delivery networks (CDN), external users will access one or more services through different access points depending on criteria like user experience (the closest the better), local laws (payment card regulations) or availability. Internal users will access the services from an internal private network.
The database will often be centralized with a mix of highly transactional, partitioned and read only content.
While this model has demonstrated its value,
- it has a considerable setup cost and time and
- it is not elastic, i.e. it does not scale out or scale down on demand,
Elasticity is necessary to reduce risk and encourage business agility.
Below is a very simplified representation of a company IT infrastructure before the cloud:
With the Cloud
With the advance of the cloud, infrastructure becomes a commodity. It can be deployed, scaled and decommissioned on demand while only paying for the actual usage.
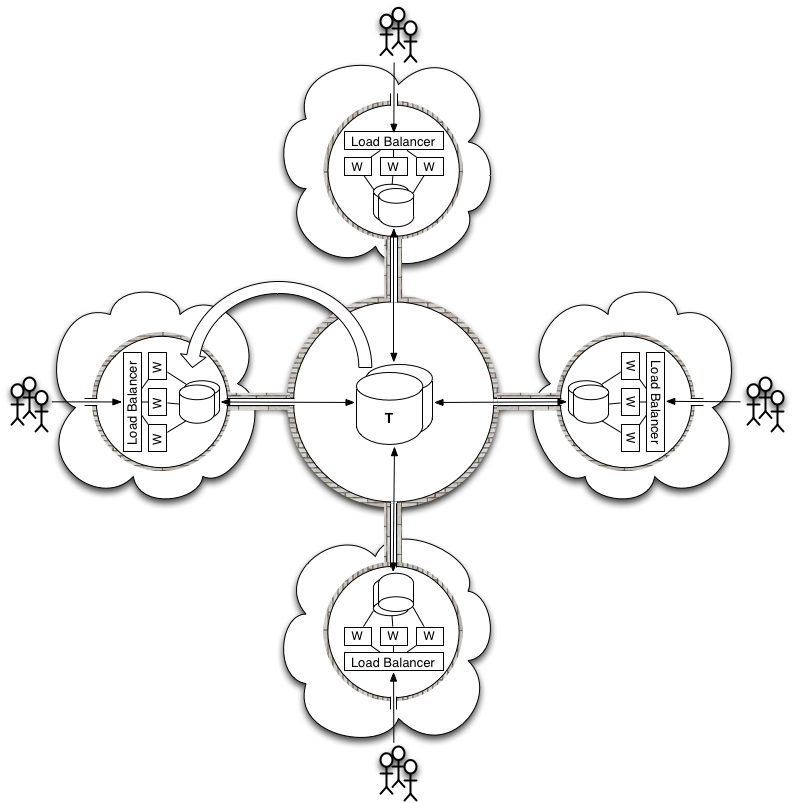
Companies can offload their rigid private datacentres and gain more agility. Database can be partially moved to the cloud depending on the usage pattern:
- read only and partitioned databases will be prime candidate for migration,
- highly transactional databases will remain centralized, either in private datacentres or on a limited number of cloud infrastructures, resulting in uneven performance depending the origin of the request.
In this model, all users, internal and external, access the service through the Internet.
To avoid vendor locking and improve their resilience, companies can use a federated cloud.
In our simplified diagram below, the application front-end as well as the read-only and partitioned databases have been moved to the cloud. The transactional data have remained on the private infrastructure but could have been moved to one of the cloud provider:
Database on the Federated Cloud
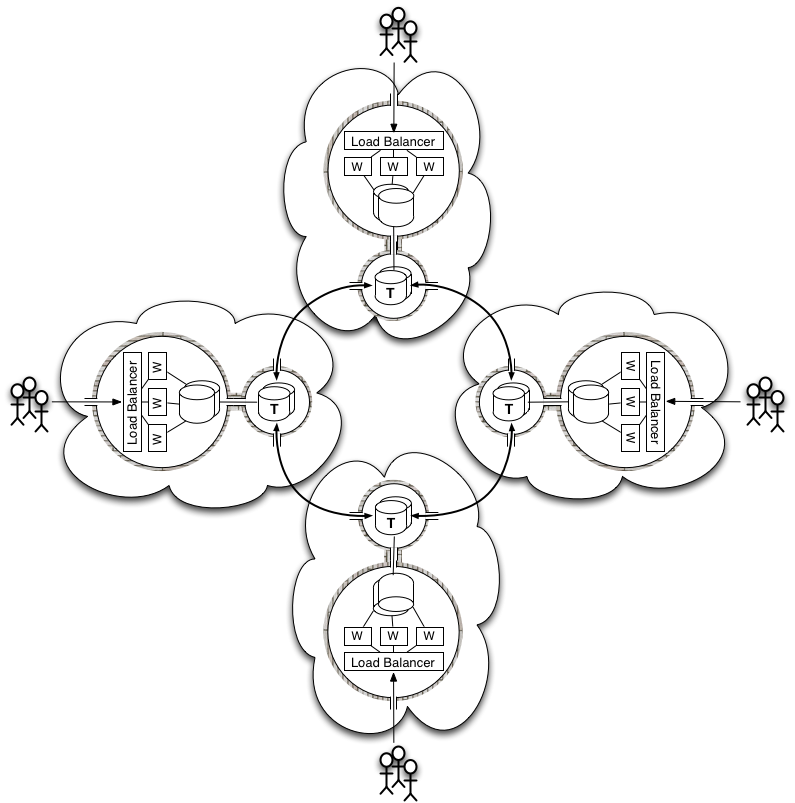
The next step is to distribute transactional databases across the federated cloud. In this model,
- database user will get similar performance from each cloud provider and
- resilience will be improved.
While this is easier said than done as distributing a transactional database is very difficult mainly due to network latency, solutions exist that either
- relax the consistency constrains with new database models, for example using a NoSQL database or
- propose improved clustering implementation of existing relational databases.
The first solution gets around the network latency constraints but requires new applications to be written following the new model and existing one to be rewritten. The second solution still requires network latency to be as low as possible and a design that limits transactional requests to the minimum. In practice, applications deployed on the federated cloud will use the first solution as much as possible and the second when absolutely necessary.
One of the main advantage of using distributed databases on the federated cloud is symmetry. No provider is special. In the diagram below, we could easily add a fifth provider and simply connect the new database node to the existing ones.
Benefits
Using a distributed database on the federated cloud gives
- improved reliability,
- provider independence because there is no a privileged provider hosting the database,
- simplified deployment thanks to symmetry.
Cost
The related costs are the following:
- keeping relational database performance is more costly when distributed,
- development cost increases when using a relaxed consistency model.
Conclusion
This small article presented how the cloud influenced IT infrastructure and how the federated cloud will be used to avoid vendor locking and improving reliability. We took the view that distributed database, either relational or not, are well suited in this context. In the second part, we will list existing providers that fit this our model.
Introduction
This post gives a survey of available open source cloud service provisioning command line tools. We talk about provisioning full services and not individual pieces of cloud infrastructure, and we take the angle that command line tools come before any pretty management and monitoring application because the latter should be provisioned by the same tools as your services.
Note: This is a work in progress and this post will be augmented as time goes. Your comments are welcome as we have certainly overlooked some projects.
Service
Services is our units of deployment. They are building blocks that carry out well defined tasks. Several services can be put together to participate in a business process. Services are independently deployed following their own release schedule. When necessary, services can be grouped and deployed together.
Service is where we deliver value and therefore service must be a first class concept in any provisioning tools.
Criteria
Here are our initial criteria:
- we should be able to provision a multi node service on the cloud executing one command line,
- the tool must be compatible with Amazon Web Services (AWS), OpenStack and VMWare,
- the configuration must be file based and not buried in a database,
- it must be an active open source project.
Native Service Provisioning
Here are the tools that natively include the concept of service in their data model:
- BOSH from the Cloud Foundry project, find the documentation here,
- Juju from Canonical with the documentation here,
- Whirr from the Apache Hadoop project, a service is called a cluster.
Surprisingly, very few open source provisioning projects have a first class service concept in their data model.
Node Provisioning
The following tools can be used to provision services but do not have a native concept of service in their data model. However, their configuration semantic is rich enough to express it with some naming conventions:
- Puppet: we can start VMs, install puppet and execute puppet code to either create a puppet server and one or more clients, or configure nodes without a central puppet server. The concept of service can be added using a service property and using puppet environment to isolate different services from each other.
- Chef: Using knife plugins to start a node on different IaaS and a mix of knife-server to bootstrap a chef server, and knife boostrap to start and configure clients.
- Pallet a clojure command line tool build on top of the jclouds library.
- Salt Stack see OpenCredo post about it.
- CFEngine.
- Ansible.
Related Tools
This section lists some related tools worth mentioning.
Infrastructure Management
- delta cloud is not a command line tool but a server providing a REST API. Admin Manazine has a good article about it.
Libraries
Here are the libraries underlying most of the provisioning tools described above:
- jclouds, a java library,
- dasein, an other java library,
- Fog, a ruby library and
- Apache Libcloud a Python library.
Conclusion
We have given the current list of open source cloud service provisioning command line tools. We have insisted on having a first class service concept because services deliver the value. We have found that very few open source tools have it.
Introduction
This post is the first of a several articles describing a model of software deployment called Service Oriented Operation and Provisioning (SOOP). This model has been developed while helping the Financial Times, one of the world’s leading global business news organisations, to improve their service delivery.
In part one, we will describe the opportunities of improvement that we found and the model that was developed as a result. Part two will focus on the implementation, called FT Cloud, and how it was received by developers and infrastructure teams. Part three will present some thoughts about the model and will propose some refinements.
It is important to make a clear distinction between the model and its implementations. No implementation can save a flawed model but a good model can be implemented in many ways. This model is far from perfect but is a first step in the right direction.
The Objective
Our objective was to reduce the cycle time between business requirements and product delivery to customers. Here we use the concept of cycle time as described in [1, p. 62], where time is the universal currency:
“Everything that goes wrong in a process shows up as a time delay. Defects add delay. Complexity slows things down. Low productivity shows up as taking more time. Change intolerance makes things go very slowly. Building the wrong thing adds a huge delay. Too many things in process creates queues and slows down the flow. Time, specifically cycle time, is the universal lean measurement that alerts us when anything is going wrong. A capable development process is one that transforms identified customer needs into delivered customer value at a reliable, repeatable cadence, which we call cycle time. It is this cycle time that paces the organization, causes value to flow, forces quality to be built into the product, and clarifies the capacity of the organization.”
When we started to look at our cycle time at the end of 2010, the results were not as good as they could be. We were releasing to production every four to six weeks and it was a major endeavour which often tied several people for a full sprint.
We knew that we could do better.
What Could We Improve
We found several inefficiencies that could be classified in two categories:
- too much organizational frictions and
- a long feedback loop.
The sections below will address each of these concerns separately.
Organizational Frictions
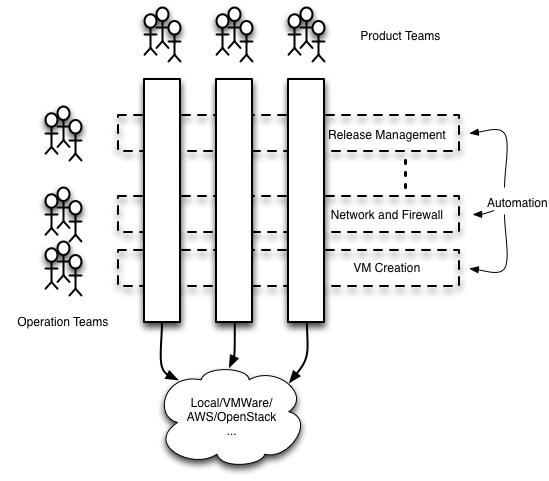
The first inefficiency was due to organizational frictions resulting of a misalignment of priorities and the dilution of responsibilities between teams.
In our case, it was the classic divide between operation and product teams where:
- product teams are close to the business and responsible for developing and delivering new products fast,
- operation teams are further away from the business and responsible for existing product availability and new product platform creation.
Their priorities are not aligned or even in opposition but they share the product delivery responsibilities since operation owns the platform on which products are deployed. This is source of tension.
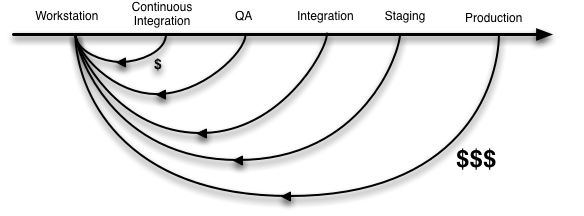
The result was the situation illustrated in the diagram below where the operation teams acted as gates during product delivery. Each time a product had to go through a gate, precious time and energy was lost in
- communication (and misunderstanding),
- task switching and
- delays.
Since the operation teams must serve several product teams, they are an obvious bottleneck.
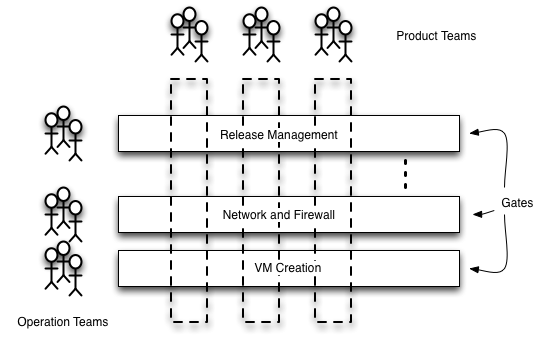
But there is another side to this story: as product teams did not take full responsibility for product delivery and availability, they had a tendency to throw things over the wall, brushing over non functional requirements like monitoring, disaster recovery or simply operational documentation. This in turn was feeding mistrust in operation teams.
It must be emphasised that the inefficiencies are not due to teams or individual competencies. Individuals in each team were all highly qualified professionals with an excellent knowledge of their core specialities. The inefficiencies described here are the result of a certain organizational structure with its ownership, responsibility and control characteristics.
Long Feedback Loop
The second inefficiency was the long feedback loop where defects were detected too late. Finding a defect at a developer’s workstation is always less expensive than discovering that same defect further down the delivery pipeline. A defect in production can have far reaching consequences and defects were unfortunately often found at this ultimate stage.
The reasons for such a long feedback loop were the following:
- manual and non repeatable configurations,
- no environment identical to production before reaching production,
- not enough environments available.
As a result, each deployment to production was an adventure full of surprises.
The Vision
In our ideal world, each product team has full responsibility for their product development, deployment and maintenance, and it is able to create the required infrastructure and deploy to it automatically.
To achieve this, we had to remove the gates and replace them with automation. The product teams choose or develop the right automation for their specific needs. The operation teams either provide design patterns and specialised advice to product teams, or they develop reusable automation libraries. In any case, product teams must have the freedom to choose since they are ultimately responsible.
In the future, it will be more and more likely that the right tool for the job will be already available from an external provider.
To reduce the feedback loop, we applied the Continuous Delivery principles [2, p. 113][3]:
- Only Build Your Binaries Once (Every build is a candidate for release),
- Deploy the Same Way to Every Environment (Do it automatically),
- Smoke-Test Your Deployments,
- Deploy into a Copy of Production,
- Each Change Should Propagate through the Pipeline Instantly,
- If Any Part of the Pipeline Fails, Stop the Line.
As a result, we will release with confidence and more often. Delivering more often shortens the feedback loop between our customers and our business resulting in products and services that actually fulfil our clients’ needs.
The Model
Note: We describe the model as implemented at the Financial Times. The implementation will be described in part two of these articles. In part three, we will examine the lessons drawn from this experience and potential improvements.
Entities
Here are our entities:
-
Services are the units of deployment. They are building blocks that carry out well defined tasks. Several services can be put together to participate in a business process. Services are independently deployed following their own release schedule. When necessary, services can be grouped and deployed together.
-
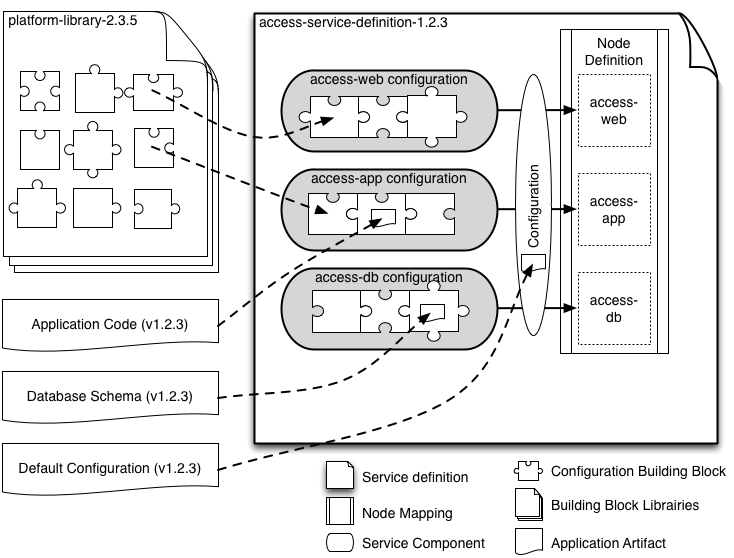
Service definitions are versioned artifacts that encapsulate everything required to deploy services. Knowing a service definition name and its version must be enough to deploy a service with a simple command line. Services definitions are composed of service components and node definitions.
-
Service components are the building blocks of a service definition, for example a database or an application server configuration required to support service delivery.
-
Environments are isolated infrastructure resources like CPU, network and storage, with specific capacity, reliability, accessibility and security requirements, for example we can have development, test and production environments.
-
Domains are sets of nodes that collaborate with each other to provide one or more services. Domains have unique ids and belong to an environment.
-
Domain Definitions configure the number of nodes, their roles and the service definitions that are deployed in a domain. The domain definition can also override any default service configuration contained in the service definitions.
-
Nodes are any network-connected virtual and physical machines. Nodes have unique names. Services are delivered by one or more node(s). Node are not shared between services.
-
Node definitions are mappings between service nodes and service components.
Service Definition Details
The service definition artifact is the cornerstone of the SOOP model. It must encapsulate everything required to deploy a service including any application binaries, database schema and default configuration. The service definition is the blueprint of a service and can be the result of a build tool that gathers all the required components and packs them. It is likely that service components will themselves be composed of building blocks provided by libraries.
Since the service definition is an artifact, it can be stored and exchanged. It can also participate in a continuous delivery pipeline and depending on the acceptance criteria, it will reach production unchanged or it will be discarded. In addition, each service definition is built only once and deployed the same way everywhere.
Service Deployment
A deployment tool will interpret a domain definition, create the nodes if necessary, associate them with their role and start the configuration process. The configuration process will read the node definitions and configure the corresponding service components. Services are ready for use when all nodes are configured.
Since services are well defined by their versioned artifact, it is easy to know exactly what has been deployed in a domain. Testers know, for example, that they are testing an instance of the access-service-3.2.3.
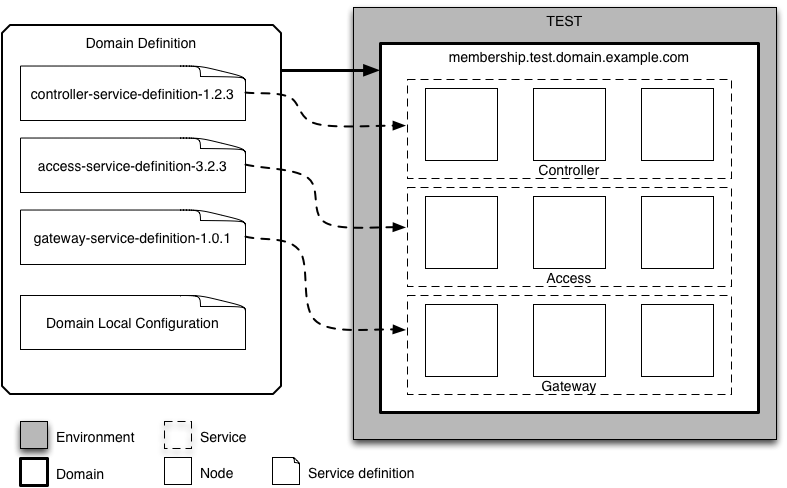
Domains act as a naming scope as a service definition can be deployed several times in the same environment, for example in a development environment where each developer can create their own domain. On the other hand, the same service cannot be deployed more than once in the same domain.
Service deployment tools should be able to deploy the same service definition several times in the same domain and they should be able to upgrade a service using a new service definition version. Depending on service specifics like database migration schema, service downgrades can be handled by deployment tools or by the underlying virtualization platform, for example using virtual machine snapshots.
Benefits
By encapsulating in one versioned artifact everything required to deploy a service, we enjoy the following benefits:
- there is no manual configuration,
- we deploy in the same way everywhere from a local workstation up to production,
- we know what we are testing,
- defects are discovered earlier,
- we trust our deployment since it has been tested many times,
- everybody (testers, developers, operations, trainers) can deploy a service without knowing the deployment details,
- product teams can control deployment,
- operation teams can review the deployment code,
- knowledge is progressively documented in code,
- we can reuse configuration building blocks and create platforms, and
… the list goes on.
Cost
SOOP has the following costs associated to it:
- it requires people to change their habits,
- automation can take some time to get right and there is a setup cost,
- operation teams will need training to move towards an automation-developer role,
- product teams will need training to understand infrastructure better.
- people will resist change as they will feel threatened in their role.
However the benefits largely outweigh the costs very quickly after the initial learning curve.
Conclusion
This article describes a deployment model called Service Oriented Operation and Provisioning (SOOP). Its originality lies in the use of versioned service definition artifacts that encapsulate everything required to deploy services. After the initial learning curve, using SOOP allows product teams to have full control and responsibility for their product delivery while operation teams focus on their specialised added value. As a result, SOOP will cut delivery cycle time by reducing organizational frictions, shortening the feedback loop and automating deployment. Reducing cycle time brings customers closer to the business and results in better products for the benefit of all.
References
[1]: Implementing Lean Software Development From Concept to Cash, Mary Poppendieck and Tom Poppendieck, Addison-Wesley Professional, 2006
[2]: Continuous Delivery: Reliable Software Releases through Build, Test, and Deployment Automation, Jez Humble and David Farley, Addison-Wesley Signature, 2010
[3]: Continuous Delivery: Anatomy of the Deployment Pipeline, Jez Humble and David Farley, InformIt, 2010
Imagine is a small tool that creates a Vagrant base image. I maintain for my personal use and learning. Other tools like VeeWee or BoxGrinder would do the job very well but I wanted to get my hands dirty and solve the same problem using good old Bash.
To achieve our goal, we need the official Centos 6 ISO image, a Bash script and a kickstart script.
This is a work in progress:
- the script is geared toward OSX and you will need to adapt it for other operating systems,
- some of the hardcoded code would need to adapted to your requirement.
Please find the code on github and read the README file.
1. Command Line
If you look under imagine/virtualbox, you will find the create-base-image command which is used like this:
create-base-image vmname iso_file kickstart_file
where
- vmname is the name of the base image,
- iso_file is the path to the download Centos 6 ISO on your file system,
- kickstart_file is the kickstart file that will be used to customize your base image.
You will need to download Centos 6 base image from a mirror near you.
If you have download the CentOS-6.3-x86_64-bin-DVD1.iso base image in the /tmp directory, the following command will automatically create a new base image with the vagrant user in the ~/stores/ovf/test directory.
./create-base-image test /tmp/CentOS-6.3-x86_64-bin-DVD1.iso centos6-ks.cfg
You can change the target directory either by modifying the Bash script or by setting the OVF_STORE to the root your ovf store.
2. The Code
The code is separated in two parts:
- the Bash script that interacts with VirtualBox using the VBoxManage command line,
- the kickstart script that provides the initial configuration and the post install scripts.
2.1 Bash script
The role of the Bash script is to
- create a new virtual machine,
- create an empty hard drive image and mount it,
- create a floppy image countaining the kickstart script and mount it using code from here,
- mount the OS iso image,
- boot the VM,
- select the kickstart boot script from the floppy using the BoxManage controlvm keyboardputscancode command,
- reboot several times to allow the post installation script to run and clean itself.
The main trick is to use a mounted floppy to allow kickstart installation without having to rely on any network kickstart server and the related DHCP configuration. Thanks to VirtualBox ability to send keystrokes to a VM, as described here, we can automatically select the kickstart file on the floppy disk on boot.
2.2 Kickstart script
The kickstart script is a template. Any ${variable name} place holder will be replaced by the corresponding exported variable from the bash script using a simple Perl command.
In addition to the standard kickstart commands, the script will:
- create a local user with name ${USERNAME},
- copy your public ssh key in this user authorized_keys file,
- create a post installation script under /etc/rc3.d.
The post installation script will be run during the next reboot and, in this case, will install VirtualBox Guest Additions. It will then clean itself.
Conclusion
This little tool shows how simple it is to create and customize a base image using simple tools like Bash and kickstart. Hopefully, you will find it usefull.
My talk at PuppetConf2012
In September 2012, I had the chance to present a talk at PuppetConf 2012. The tile of my talk was Using Service Oriented Operation and Provisioning at Financial Times.
This was a good opportunity to describe my concept of SOOP (Service Oriented Operation and Provisioning) as developped for the Financial Times. Stay posted I am currently writing an article giving more details on SOOP, the rationals and the lessons learned when trying to apply it to a medium sized organisation.